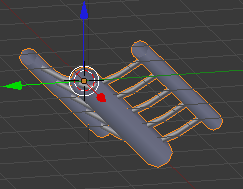
This is the final result of this tutorial:
Before reading this tutorial, be sure to deselect this button:
Start by deleting the default cube (X) and add a circle (Shift A - Circle), and on the left, change the number of vertices from 32 to 8. We need a lower poly count in order for the roller coaster to run up to speed in the viewport. Press 7 then 5 on your number pad to go into top orthographic view. With the circle selected, press R - Y - 90 to rotate it 90 degrees along the Y axis.
Scale it down (S - 0.25), and go into Edit Mode (Tab). Now extrude it 5 units along the X axis (E - X - 5). Press Ctrl + to select the rest of the tube and press Shift D to duplicate it, and now right click to prevent it from moving away from it's starting point. Now press G - Y - 1 to move it up along the Y axis. Now scale it down on the Y and Z axes (S - Shift X - 0.6).
Now duplicate it and move it the opposite direction (Shift D - Y - -2). Press B and drag a box around the tube on top to select it.
Press 1 on your number pad to go into front view, then move the selection up along the Z axis (G - Z - 0.5). Now we'll go back to top view (numpad 7), and we'll add some loop cuts to each tube (Ctrl R). It's up to you how many to add; the more you add the smoother your roller coaster will look, but the slower it will run in the viewport and the longer it will take to render. I'm going to add 3 loop cuts to each tube.
Go back into Object Mode (Tab) and on the panel on the left, select Smooth under 'Shading'. Now tab back into Edit Mode, select everything (A) and Press Ctrl N to recalculate the normals. Now duplicate (Shift D) the top tube (select it by pressing B and dragging a box around it). Rotate it along the Z axis 90 degrees (R - Z - 90) and move it along the Y axis (G - Y - -1). Now scale it down (S - 0.4).
Press G - X - -2 to move it along the X axis near the end. Duplicate this and move it along the X axis again (Shift D - X - 1). Repeat this duplicating and moving it until you have something like this:
Now go into side view (press 3 on your number pad), and select the middle loop by pressing B and dragging a box around it.
Move the selection down along the Z axis (G - Z - -0.5). Now deselect your current selection, and select the two loops around it. Now press G - Z - -0.3 to move it down along the Z axis again, but not as much. If you tab back into Object Mode now and rotate your view around some, you should see this:
Go back into top view (numpad 7), and let's give it a material now. On the right, click on the Materials button (the checkered ball) and add a new material. Under 'Diffuse' change the color to whatever color you want your roller coaster to be. I'll make mine blue.
Great job! You've completed this part of the Roller Coaster creation tutorial! In the next part, we'll be covering how to actually make the track longer and have all the twists, turns and drops that a roller coaster should have. If you have any questions, comments, or problems, post them in the comments below. Thanks for reading!


Cool tutorial, Ben! It's pretty awesome-the animation, I mean.
ReplyDeleteThanks, Natron1!
ReplyDeletethis is great, thanks
ReplyDeleteYou're welcome!
ReplyDeletethnx really helped
ReplyDelete