
This is the final result of the tutorial:

This tutorial will teach you how to:
- Create a realistic doughnut mesh
- Create a realistic (and tasty looking) doughnut material, with no UV Mapping or image textures
- Use color bands effectively
So let's get started! I'll be using Blender version 2.55 beta, which can be downloaded here: Blender 2.55 beta
Begin by pressing X to delete the default cube, and Shift A to add a Torus.

On the toolbar to the left, change the Minor Radius to 0.65. This will make the doughnut a lot thicker, and the doughnut hole a lot smaller.

Next, under the Shading title, click on Smooth. This will make it so that the doughnut doesn't look so blocky and sharp.

Now on the right, go to the Modifiers tab (the one that looks like a wrench), click on Add Modifier, and select Multiresolution from the menu.

On the modifier, click the Subdivide button several times. I've set my subdivisions to 4; whatever you set yours to depends on how much your computer can handle (and yes, mine can handle more than that ;). This is adding more vertices and smoothing them out, to make the overall mesh much smoother. After you've subdivided, enable the Optimal Display option. The optimal display will make it so that when you render, it only renders the faces of the mesh that you can see directly from your point of view, and doesn't render the ones on the back that you can't see. This speeds up render time and 3D viewport interactivity.

Now click on the Textures button (the button that looks like a checkerboard), and add a new texture. Name it Displace. Naming something isn't necessary, but it helps when you have multiple objects, materials, textures, etc. in your scene.

You'll notice that it creates a Clouds texture by default; that's okay, but we need to raise the Depth to 6 (the maximum depth value). The higher you put the depth, the more detail the texture has.

Now go back to the Modifiers panel, and add a Displace modifier.

Click on the box underneath the Texture title, and select our Displace texture we made just a second ago.

You should now see a result as shown above; this obviously doesn't look anything like a doughnut. The problem is, the displacement is too strong. All we have to do is lower the strength down to about 0.05. You should now see something like this:

We have simply added a tiny amount of detail to make the doughnut look a little more realistic. But there's still one underlying problem; and that's that the doughnut is still too perfect because we need to add more displacement, but on a larger scale. In other words, now that we've added some of the smaller bumps, we need to deform it. A lot.
Start this by going into Top View by pressing 7 on your number pad, then 5 to go into orthographic view. Before we switched to orthographic, we were in Perspective View. This means that there's a vanishing point, hence the closer something is to your viewpoint, the larger is is, and the farther, the smaller. This can be inconvenient while editing our mesh, so switching over to Orthographic View will make it much easier.

Press Tab to enter Edit Mode, then A to deselect everything.

Now press the O key to turn on Proportional Editing. This way, if we select a couple Vertices (B for Box Select, then click and drag) and move them around (G), other vertices within a set radius (defined by the circle that appears when you move them) will follow it, but they will be drawn less and less the closer they are to the outer rim. You can adjust the size of the circle by scrolling with your mouse wheel.

Just do this continuously until you think your doughnut is deformed enough. Remember, if you want it to look realistic, it needs to have a relatively large amount of deformation, as doughnuts often get squashed up against the edges of the box and against other doughnuts.

Remember, since we're working in 3 dimensions, we need to go to the front and side views as well (Front - Numpad 1 Side - Numpad 3). By now your doughnut should be well deformed, so now we're going to give it another displacement modifier. But before we do that, we need to apply our current modifiers. Do this by clicking Apply on both of the modifiers we've added.

Now add your new displacement modifier, and select the Displace texture again. But this time, go back into the textures panel, and change the Depth to 0, and the Size to 0.5. Back on the modifier, change the Strength to 0.05 again.
Now out doughnut's looking good, but it's too tall, so press S - Z to scale it down along the Z axis.

That's it for the mesh; now we need to move on to the materials. Click on the Materials button on the right (the checkered sphere), and add a new material. Name it Doughnut.

First things first, set the diffuse Intensity to 1. This will ensure that our material won't render darker than it actually is. Put the Specular at 0.24, and the Hardness at 55. This adjusts how much light our doughnut reflects, and how widely it reflects it.
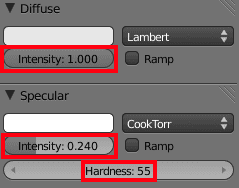
Next, raise the Emit value to 0.1 (this will make it so that the doughnut is emitting a small amount of light), and enable Mirror. Under the Mirror panel, set the reflectivity to 0.12, and the Fresnel to 1.8. The Fresnel decides how much of the material is showing through the reflection.
You should now see something like this in your Material Preview Window:

Now go into the Textures tab, and add a new texture. Name it Warp. This texture will warp all of the other textures we're going to add. Scroll down to the bottom, and disable Color, and enable Warp. Set the warp value to 0.46.

Now under the Mapping panel, click on the boxes beneath Flat and change them all to Z. You won't see any difference on the boxes, but this makes it so that the blend texture is going vertically instead of horizontally. Make sure you do this with all three of them.

Scroll back up to the top, click on the channel underneath the texture we just added, and add a new texture there. Name it Color, and change the type to Blend.

Under the Colors panel, enable Ramp. We've just now added a color ramp; with this, we can control the colors in the blend texture, and how sharp the transitions are. Click on the color band to the far left (you can't see it, but it's there), and click on the black box underneath it. Raise the Alpha value to 1.

Now we can go in and adjust the colors, and add new ones as needed. To add a new color band, simply click on the Add option right above the color ramp. You can then change it's color, and move it around the ramp accordingly. I won't go through every color band, but this is my result shown below. Keep in mind that the colors you're seeing in the texture preview window aren't accurate; just pay attention to the way you see them on the actual ramp.

I lowered the alpha value on the really light spot in the middle simply because I couldn't seem to get the color right, so I had to adjust both the color and the alpha values to get the result I wanted.
Now at the bottom again, enable Displace, and raise that value to 0.13, then raise the Normal value to 5 (but don't actually enable the normal). This will use the color ramp to displace our mesh even more. Also, if you're using 2.56a or newer, make sure you enable 'Old Bump Mapping'. Any texture we add where we use the Normal slider, enable this or you may experience a few problems with your textures.

Now add a new texture, change the type to Voronoi, and name it Bump 1. Now enable the Ramp option again, to allow us to work with the color bands, and switch the color bands around, so that the black is on the left, and the white is on the right.

Now scroll down to the bottom, disable Color and enable Normal (normal, to sum it up quickly, means 'bump'), and set the normal value to 0.25.

Now add another texture and name it Bump 2. Lower the Depth to 1, raise the Size to 1.55, and enable Ramp so we can work with the color bands yet again. This time, drag the black one up really close to the white one. This will sharpen it.

At the bottom, keep Color enabled, and also enable Normal. Drop the color value to 0.065, and drop the Normal value to -0.5.

Now add one more texture (last one; hang in there!), and name it Bump 3. Put the Depth at 0, and the Size at 0.65. Enable the color ramp again, and drag the white a little closer to the left, and drag the black a lot closer to the white, as shown below.
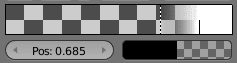
Enable Normal, and raise the value to 0.84. Lower the Color value to 0.18.

That's it! If you take a look now at your Material Preview Window, you should see something like this:

If you render now, you should get something like this (results will greatly differ depending on what sort of lighting setup you have):

If you wanted to take this image a little farther, I'd recommend you enable Subsurface Scattering (SSS). I had to tweak the settings on it a bit, but in the end it turned out.
So that's all! You've just learned how to create a relatively tasty looking doughnut in Blender! You may want to mess with a few things; typically the cleaner the mesh, the more tasty it looks, so try different levels of detail and see what you come up with.
If you encountered any problems, or have any questions or comments, post them below. If I haven't responded for a while, send me an email here: ben.amend@gmail.com


