Saturday, January 29, 2011

These Blender Tutorials are... Moving

Hey, everyone!  I've recently bought a domain name and have put up a website under it, and that website is where I will be posting from here on out.  I've just uploaded the second (and final) part of the firework tutorial there, so go check it out!  I still have quite a few things to add to it, but it's coming along pretty nicely so far.

So, I guess this is most likely the last post you will ever see on this blog.  All of my tutorials will now be posted here: http://www.benamend.com/

Tell me of any ways you think my new site could be improved, as I want to make it as good as possible for the viewers/readers.

And I think that's it.  I'll still be visiting this blog occasionally to check a few things (i.e., my artwork, as I want to have a similar setup on my site in that way), but other than that, I believe I'm finished posting here.  Thanks for reading the tutorials all this time, and I hope you'll continue to do so on my website.

Sunday, January 23, 2011

How to Create Fireworks in Blender 2.5 - Part 1

Hello, everyone!  Sorry it took so long for me to release this tutorial, as I was experiencing technical difficulties.  What technical difficulties you ask?  Well, notice how there's no video tutorial accompanying this text tutorial.  My video recording software isn't working, and until it does, or I can find a better one, you won't be seeing any new video tutorials on my site.  I'm sorry to disappoint some of you, and I'm sure that some time soon I'll get it up and running again.

With all of that aside for now, I've decided to release the text tutorial anyway so you could have something to follow on my site, even though it's not video.

Let's get started now so I don't bore you with some long introduction :P  This part will cover making the trail that the firework leaves behind as it's being shot into the air.

First, delete the default cube (X), and add an Icosphere (Shift A - Mesh - Icosphere).  Press Tab to go into Edit Mode, and press A to deselect everything.  Now press B and drag a box around all of the vertices except the bottom 5, as shown below.


Now delete those as well, and select everything else by pressing A again.  Now type S - Z - 0 to scale these vertices along the Z axis 0 degrees.  This will make our shape completely flat.  Now press Shift - Ctrl - Alt - C, and select 'Geometry to Origin'.  This will move our mesh to it's origin point.  If you tab back out into Object Mode, you should have a 2-D Pentagon.


You may be wondering why I'm using this for the trail emitter instead of a plane, and I'm not really sure why, but it gives better results.  Plus, it's only 4 additional faces ;)  Now press S and scale the object down so that it's really, really tiny.  I don't have a precise measurement for this, and it doesn't particularly matter.  If the finished trail looks good to you, then you did it right.


Now, make sure you're on frame 1 (check the bottom of the screen), and press I, then choose Location on the menu.  This will insert a keyframe on frame 1.


Move ahead to frame 20, move your object up (to about one third of the way to where you want it to stop moving and explode) and insert another keyframe.  Do the same for frames 40, and 60.  Now if you go back to frame 1 and press Alt A, your object should move upward within the time period of those 60 frames.

Now let's move on to the actual trail.  For this, we'll give it a particle system.  Drag the panel on the right out a little bit so you can see the particles button, then add a new particle system and name it 'Trail'.  


Now set the Amount to 10,000, the End to 60, the Lifetime to 30, the Random Lifetime to 1, and the Random (under the Velocity panel) to 0.2.  This will make it so that our object emits 10,000 particles total, stops emitting particles at frame 60, the particles will die out in the general area of 30 frames after they have been emitted, and they will be slightly randomized so it doesn't look so perfect and unnatural.


Now under the Render panel, uncheck the box next to 'Emitter'.  This will make it so that when you render, it won't display the object that is emitting the particles.

If you were to render now on, say, frame 40, you'd get something like this (I set my background color to black):


Obviously, this isn't going to work.  It looks really terrible, and doesn't resemble a firework trail in the least.  Let's change that.  The particle system is currently using material 1, so let's add a material for it to use.  Click on the Materials button, and add a new material.  Name this one Trail as well.  Change the type to Halo, raise the Add to maximum, and set the Size to 0.025.


Now if we render, we should get this:


It is lacking a little punch, but we'll fix that by adding glow in the next part of this tutorial.  That's all for this part, though!  I'll try to get the next part out as soon as possible, but it may be a while since I'm very busy at the time.  If you have any questions, comments, or problems, post them below or send me an email at ben.amend@gmail.com.  Thanks for reading!

Wednesday, January 12, 2011

Fireworks

Well, no one's responded to my previous post as far as tutorial requests go, so I've thought of something.  As soon as I can, I'm going to re-create the firework tutorial.  I'll include a video and text tutorial (in the same post), and this tutorial will be much better than the last one, and it will give much more satisfying results :D

Since I couldn't get the video to upload right, here are a few images of it:


Saturday, January 8, 2011

Poll Results

Well, the poll has closed, and here are the results:

I prefer video tutorials: 12%
I like text tutorials: 37%
I like both: 50%
Other: 0%

Oh, and don't ask me why an extra 1% was somehow left out...  obviously 12 + 37 is not 50; I guess the poll was just rounding it up?

Anyway, towards the beginning, video was winning over.  Both still had the majority of the votes, but over yesterday and last night, text won over.  Now that doesn't mean I'll stop recording video tutorials.  Like I said, I'll be trying to do a little of both.  All I need now are tutorial requests.  Anyone?

Thursday, January 6, 2011

Current Conclusion

Okay; so I've put up the poll a few days ago to ask whether people prefer video tutorials or text tutorials.  Today is your last day to vote, so go and do it if you haven't yet.

However, 75% of the votes have gone towards the Both option, and 25% has been Video Tutorials.

Unless this has changed by tomorrow morning, I am going to attempt to create video tutorials, and write a text tutorial to go with it.  This appears to be the best conclusion to all of this, but I may not be able to keep it up due to time restraints (as text tutorials do take a lot longer to create than video).

But we'll see how it works out.  Expect a new tutorial some time this week!

Saturday, January 1, 2011

Addressing the Readers

Hello, everyone! I've been looking at my pageviews lately, and I've noticed that my video tutorials aren't getting very many views. Technically, I'm not sure if this is because the people reading my blog prefer text over video, or if they think I do a poor job at the video tutorials (if you think so, please state it below; I don't want to keep recording these tutorials if people don't want to watch them). So, I've started a poll to the right of this post -->


I'd like it if all of you voted, but I know that's not going to happen.  Just keep in mind that all you have to do is click an option; nothing else required.  I'd really appreciate it if this worked out, because I'd like to know what format my viewers want the tutorials delivered in: text, or video.

Thanks for reading this post, and thanks for voting!

Friday, December 31, 2010

How to Create Fireworks in Blender

Happy New Year, everyone (depending on when you're reading this and what time zone you're in :P)! This tutorial was a bit rushed, so if you think I left anything out or if you had any problems, let me know in the comments below. Enjoy!

Monday, December 20, 2010

Christmas Present

Happy Holidays, everyone!  In light of that, I've whipped up a little something and decided to upload it here.  I know it's not the best idea when it comes to Christmas related things, but I wanted to do something that hadn't already been taken/made into a tutorial, so here it is!


How to Create an Ocean in Blender

Well, it appears as though a solution has been found for the video tutorials; I know this isn't holiday related as I wanted it to be, but I haven't recorded any tutorials on that topic as I haven't been able to upload any, so I stopped recording the tutorials.  However, I'll try to get a tutorial posted that's Christmas related as soon as possible (in the remaining 4 days left since I want to release it before Christmas).  Sorry about that, though :D

Saturday, December 18, 2010

Sketch Effect Update

I just updated my sketch effect tutorial; to anti-alias your image, click on the render tab, then enable Full Sampling (under Anti-Aliasing).  I've modified the original post, too.  Believe me, this gives much smoother results :D

Before:


After:

Thursday, December 16, 2010

How to Make a Slightly Abstract Desktop Background in 60 Seconds

Well, it takes 60 seconds if you know what you're doing :D  I'll be using Blender 2.55 beta for this tutorial.

The final result of this tutorial:


So let's get started!

First, press 0 on your number pad to go into camera view, then delete the default cube by pressing X.  Add an Icosphere (Shift A - Mesh - Icosphere), and on the panel to the left, set the Subdivisions to 4.


On the panel to the right (Make sure you're in the Render tab), set the camera dimensions to match that of your desktop size.


Now in the 3D viewport, scale the sphere up (S) so that it's larger than your camera; move it if you need to (G).


Now go into the World tab, and change the background color to black.


Now go into the Materials tab, and give your Sphere a new material.  Change the type to Halo.


Change the diffuse color to whatever color you want, and drag the Add value all the way up.


Now enable the Rings option, and make it sort of a lighter version of your color.  So basically:

If you chose Blue, use Turquoise for the ring color
Red = Orange
Green = Yellow
Purple = Pink
etc...

You can sort of approximate for those colors.


That's it!  Render it out, and see what you've got!  Thanks for reading this short tutorial, and post any questions, comments, or problems below.  Remember, I need more tutorial requests, as I'm running out of ideas that haven't already been taken.

Wednesday, December 15, 2010

Tutorial Requests

Anyone have any Blender tutorial requests?  I have a couple ideas, but I need to think them through a little more before doing anything with them.  In the mean time, fire away :D

The Basics of Terragen 2 - Part 6

Hello, everyone!  This will be the final part in the Terragen 2 tutorial series (then I'm back to making more Blender tutorials!  But I need tutorial requests :D), and this will cover both Water and Objects.

This is the final result of all of the tutorials combined (with higher detail settings and different render dimensions):


So let's get started!  Begin by first selecting the big Water button at the top, then adding a Lake water object.


Just about the only thing we need to change on our water is the water level, which we can adjust by changing the Water Level slider.


But how high do we put the water?  This can be answered by hovering your cursor over the 3D Preview (where you want your water to be, more specifically) and look at the number next to the letter 'y' on the small panel beneath the window; then type that number into the water level value.


That's it on the water!  That was short, wasn't it?  Yeah, that's why I've incorporated Objects into this final part, too.  So let's add some in!  If you look at the first part of this tutorial (that can be found here) I suggested you download the two additional plant packs at the bottom of the page; well, this is where I'll be using them.  Let's start by clicking on the Objects button up at the top in the toolbar.

If you click on Add Object you get 2 choices; whether you want to add an Object, or a Population.  An object is just one single object, whereas a population is a group of objects.  We're going to add a population, so hover over Population and choose tgo Reader.  Locate your plant that you want to include; in my case, I'll be using the Grand Fir tree from XFrog.

You'll notice that when you add the population, nothing show up.  This is because you need to define the center of the population by hovering over the spot you want it to be in in the 3D Preview, right clicking, and selecting Copy Coordinates.  Paste the coordinates in the Area Centre spot in the properties panel.


Now our population is set, but we may need to change a few of the other settings.  In the Distribution tab, you may want to adjust the Object Spacing.  This defines the amount of space between each object.  In the Object Scale tab, you might want to adjust the size of your objects.  I won't go over those, as they're fairly self explanatory.  Once you want to test out your settings, do a quick render to see how it looks.  Once you've finally settled upon something you're happy with, click the big Populate Now button at the bottom of the properties panel.


Now I'll give you a real treat; let's add a planet :D


A box should appear in your 3D Preview; click on it, then use the arrows (or 3D manipulator) to move it around.


There are other settings for the planets, but I'm not that familiar with most of them, and I'm happy with the defaults anyway.

That's it for the final part!  I hope you've enjoyed looking at this whole series, and if you have any questions, comments, or problems you've encountered, feel free to post them below or email me at ben.amend@gmail.com.  Thanks for reading!

Tuesday, December 14, 2010

The Basics of Terragen 2 - Part 5

Hey, everyone!  In this part of the Terragen series, I'll be covering two things that can dramatically change the overall feel of your landscape: Lighting & Atmosphere

This is the final result of this part of the tutorial:


So let's get started!  Begin by clicking the big Lighting button in the toolbar at the top.


We'll first put our sun into a better position.  The only 2 settings we'll be using on our sun are the Heading and Elevation.  Adjusting the heading will basically rotate the sun around the camera, and the elevation will determine how high the sun is, to give a sunset/sunrise feel to it.  Let's tweak those until we get the results we want.  When you're rotating the sun, you'll notice a little white cross come into view.  This resembles the sun, and I'll use it as a guideline to positioning my sun where I want it to be.


After I adjusted those settings, here's what I came up with:


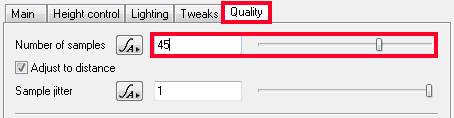
Well, that pretty much sums up the lighting part!  Now let's move on to some of the atmosphere settings.  First off, you'll notice that if you render (I'm not going to, for time's sake) there's some really ugly noise all over the darker parts of your image.  To fix this, first go to the Atmosphere tab in the toolbar, then go to the Quality tab in the Properties panel, and finally raise the Number of Samples value.  I'll keep mine at about 45 for now, but typically I won't render a final image unless the atmospheric samples are at least 55 (64 is the maximum).


There are two more things I want to do with the atmosphere settings; first, go back to the Main tab and increase the redsky decay to 3 or 4 (unless your scene isn't a sunrise/sunset).  this will add a little more red to the sky, and make it much more believable.


Now for the other thing: Clouds!  You can't have a perfectly clear sky (well, you can, but not often :P), so let's add a few clouds in there to make the image much more interesting.  Back up above the outline, click on Add Cloud Layer and select the 3D Volumetric option.


Begin by first changing the Edge Sharpness to 10, and the Cloud Density to 0.03.


Next, go to to the Density Fractal Shader by clicking on the + sign next to it, then choosing Go to Density Fractal.


On the new window that opens up, press the Random Seed button repeatedly until you're happy with the scattering of the clouds.


Now close out of that window, and under the Tweaks tab, enable Flatter Base and adjust the Base Wispiness and the Base Softness values to your taste.

Now let's add one more cloud layer; make this a high level cirrus.  The only thing you need to do to this layer is to tweak the random seed again until you think it looks right.

That's it!  I hope you enjoyed this part of the Terragen 2 series, and if you have any questions, comments, or problems related to this tutorial, please post them below or email me at ben.amend@gmail.com.  Thanks for reading!

The Basics of Terragen 2 - Part 4

Hello, everyone!  In this tutorial, I'll be covering the materials of our landscape, or Shaders as they are (inaccurately) termed in Terragen 2.  I'll be using the same landscape that I used in our last tutorial on Rendering (you can find that here).
This is the final result of this tutorial (rendered, obviously):


So let's get right into it!

Begin by clicking the big Shaders button on the toolbar at the top.


In the outline, you'll see something that says Base colours.  This is, as it states, the base color of our landscape; it's the color that's being displayed when we render our scene.  Some people use it, and some don't.  In this case, I won't; click on Add Layer and choose Surface Layer from the menu.


In the 3D viewport, your whole landscape will be shrouded in white.  Or at least, it looks like white; it's actually just a light gray.  We're going to make this layer our dirt (every landscape should have at least a tiny bit of dirt; it looks more natural), so name it dirt in the box next to the word Name.


Next, choose a color for your layer by selecting the box with the gray color in it, and changing it to a dark brown.


Now click on the + button next to the Color Function box, and go to Create New Shader - Color Shader - Power Fractal v3.  This will add color variation, and break up the dirt a little more to make it look a lot more realistic.


Now that the dirt's done, we can add on another surface layer; so let's do that.  Add another Surface Layer, and name it Grass.  Select a green color in the color box, and give your grass a Power Fractal v3 shader as well.


But there are two problems here; one is, we want to be able to see some of our dirt poking through the grass (I know it sounds like it should be the other way around, but I know what I'm doing :D), so go to the Effects tab in the properties panel, and enable Intersect Underlying.


If we take a look at our 3D Preview window, we should see something like this:


As you can see, the dirt is breaking through the grass based on slope angles; this is especially handy when creating a snow-capped mountain (or even just a mountain completely covered in snow) and you want the rock underneath to poke through.

Let's add another Surface Layer; name it Rock, and select a dark grey color from the color box.  Give this one a power fractal shader as well.  You'll notice that the rock is covering the entire mountain, but we only want it to cover a certain portion of it, and starting at a certain point in elevation.  This can be fixed by going into Altitude Constraints and selecting Limit Minimum Altitude.


The Minimum altitude determines what height we should limit the rock to, and the Min alt fuzzy zone is what controls how sharply we want the grass and the rock to blend together.  In my case, the defaults work fine (surprise, surprise!  That's a first :D), but you may need to tweak the altitude a little bit until you're happy with it.


As you can see, the rock now only starts at a certain altitude, instead of covering the entire mountain.  I'm going to add a snow layer on top, but I won't describe everything I do with it, as I'll be using the Intersect Underlying option and the Limit Minimum Altitude as well, and I just covered these two aspects.


And that's all!  I hope you enjoyed this tutorial, and if you have any questions, comments, or encountered any problems while following this tutorial, post them in the comments below or send me an email at ben.amend@gmail.com.  Thanks for reading!