

Monday, August 30, 2010

Sunday, August 29, 2010
Next Tutorial will be about...
Creating this (sorry for the poor quality):
Yep, the next multi-parted tutorial will be on creating a roller coaster, and animating a camera on the tracks to create the above. First part will be out in a day or so; remember, feel free to request tutorials in the comments on any of my posts, and I'll see what I can do. Thanks for reading, and I hope you'll stick around to read these upcoming tutorials!
Yep, the next multi-parted tutorial will be on creating a roller coaster, and animating a camera on the tracks to create the above. First part will be out in a day or so; remember, feel free to request tutorials in the comments on any of my posts, and I'll see what I can do. Thanks for reading, and I hope you'll stick around to read these upcoming tutorials!
Saturday, August 28, 2010
How to Animate a Lightsaber in Blender 2.5
Hello, everyone! This is the final part for the lightsaber tutorial series, and is obviously optional if you want to produce a still render. Let's get started!
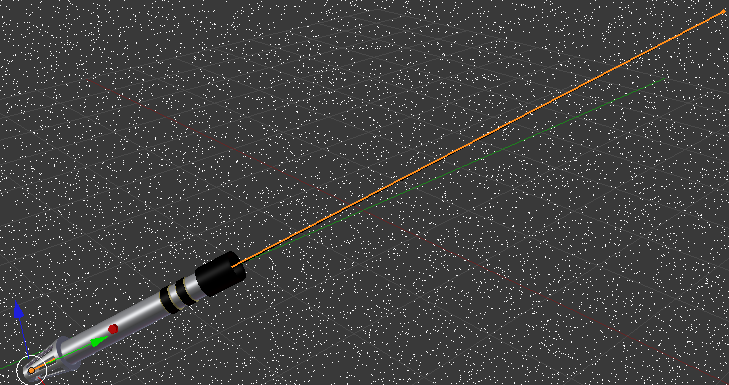
We'll begin by adding a bone (Shift A - Armature - Single Bone). Line up the bottom of the bone with the bottom of the lightsaber handle (make sure to look at front, top, and side view before continuing). Select the button on the right that looks like a stick figure, and click 'Stick' in the Display panel. You'll probably have to re-align the bone a bit, then drag the top of the bone to the top of the lightsaber blade.
Now select the bone, the camera, and the lamp, then Press Ctrl I to invert the selection. This will select the blades and the handle. Now Shift-Right Click the bone to select it, and type Ctrl P on your keyboard, then select 'Automatic Weights'. This parents the mesh to the bone, so that wherever the bone goes, the mesh will follow. You may be wondering why we can't just move the handle and two blades around together and animate it. If you do, this will be the result:
As you can see, we clearly need the bone to hold it all together properly. Now if you rotate, move, or scale your bone, you should see that the lightsaber follows it. Now we'll start on the animating. Make sure your bone is selected (Right Click), and press I and select Rotation. This is just for demonstration purposes. If you want to move your lightsaber around, select Location. If you want to rotate it (as I'm doing) select Rotation. And if you want to scale it up or down, select Scale. And of course, do all three if you want to move, rotate, and scale it. In a separate .blend file, take some time to experiment with the other options if you wish, but read the rest of the animating process first.
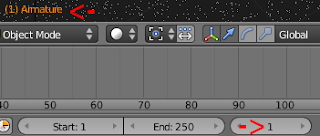
Now check these two things; if you did it correctly, the white letters in the lower left corner will now be orange. Also, make sure that the number on the bottom (as shown below) is on 1. This is the frame number, and the starting point is, of course, frame 1.
Now hit the Up arrow key. This will move forward 10 frames. You should now be on frame 11. Rotate your lightsaber as far as you want to. The farther you rotate it, the faster it will move, and vice versa. Now press I again and select Rotation (if you're rotating it). Every time you press I and select an option, you are inserting keyframes. These keyframes are the main points of animation. Once you have set your keyframes, blender calculates the frames in between to fill it in.
Now if you go back to frame one by pressing the Down Arrow key, and Press Alt A, your lightsaber should move! Now repeat the process of inserting keyframes in whatever way you want. To go up or down just one frame, use the left and right arrow keys instead. You can also click the arrows next to the frame number at the bottom.
My animation has only 50 frames, so I've set the End to 50. My timeline now look like this:

Now to render the animation. Click on the button that looks like a camera (it will take you to the rendering panel). Typically, I would save a basic animation in QuickTime format, as it is relatively straightforward and works most of the time. But in 2.53 beta, there appears to be a bug where every time one tries to render an animation in QuickTime, blender crashes. So I will use AVI Raw for this demonstration. AVI Raw files can be played in Windows Media player, and several other media programs. This can be done in the Output panel.
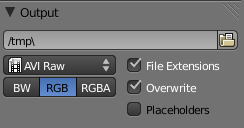
Click on the folder button (as shown above) to choose where you want your animation to be saved. I am also going to change the fps (frames per second) to 29.97, as I think it gives a smoother animation than 24 (this can be done under the dimensions panel). Finally, click the Animate button at the top of the Render panel. Once it's finished rendering, go to the place where you saved your file, and play through your animation. Great job! You've now animated a lightsaber in blender! If you have any questions, comments, or problems, post them in the comments below. Thanks for reading!
We'll begin by adding a bone (Shift A - Armature - Single Bone). Line up the bottom of the bone with the bottom of the lightsaber handle (make sure to look at front, top, and side view before continuing). Select the button on the right that looks like a stick figure, and click 'Stick' in the Display panel. You'll probably have to re-align the bone a bit, then drag the top of the bone to the top of the lightsaber blade.
Now select the bone, the camera, and the lamp, then Press Ctrl I to invert the selection. This will select the blades and the handle. Now Shift-Right Click the bone to select it, and type Ctrl P on your keyboard, then select 'Automatic Weights'. This parents the mesh to the bone, so that wherever the bone goes, the mesh will follow. You may be wondering why we can't just move the handle and two blades around together and animate it. If you do, this will be the result:
As you can see, we clearly need the bone to hold it all together properly. Now if you rotate, move, or scale your bone, you should see that the lightsaber follows it. Now we'll start on the animating. Make sure your bone is selected (Right Click), and press I and select Rotation. This is just for demonstration purposes. If you want to move your lightsaber around, select Location. If you want to rotate it (as I'm doing) select Rotation. And if you want to scale it up or down, select Scale. And of course, do all three if you want to move, rotate, and scale it. In a separate .blend file, take some time to experiment with the other options if you wish, but read the rest of the animating process first.
Now check these two things; if you did it correctly, the white letters in the lower left corner will now be orange. Also, make sure that the number on the bottom (as shown below) is on 1. This is the frame number, and the starting point is, of course, frame 1.
Now hit the Up arrow key. This will move forward 10 frames. You should now be on frame 11. Rotate your lightsaber as far as you want to. The farther you rotate it, the faster it will move, and vice versa. Now press I again and select Rotation (if you're rotating it). Every time you press I and select an option, you are inserting keyframes. These keyframes are the main points of animation. Once you have set your keyframes, blender calculates the frames in between to fill it in.
Now if you go back to frame one by pressing the Down Arrow key, and Press Alt A, your lightsaber should move! Now repeat the process of inserting keyframes in whatever way you want. To go up or down just one frame, use the left and right arrow keys instead. You can also click the arrows next to the frame number at the bottom.
My animation has only 50 frames, so I've set the End to 50. My timeline now look like this:
Now to render the animation. Click on the button that looks like a camera (it will take you to the rendering panel). Typically, I would save a basic animation in QuickTime format, as it is relatively straightforward and works most of the time. But in 2.53 beta, there appears to be a bug where every time one tries to render an animation in QuickTime, blender crashes. So I will use AVI Raw for this demonstration. AVI Raw files can be played in Windows Media player, and several other media programs. This can be done in the Output panel.
Click on the folder button (as shown above) to choose where you want your animation to be saved. I am also going to change the fps (frames per second) to 29.97, as I think it gives a smoother animation than 24 (this can be done under the dimensions panel). Finally, click the Animate button at the top of the Render panel. Once it's finished rendering, go to the place where you saved your file, and play through your animation. Great job! You've now animated a lightsaber in blender! If you have any questions, comments, or problems, post them in the comments below. Thanks for reading!
Thursday, August 26, 2010
Creating A Lightsaber in Blender - Part 3 (Background and Compositing)
Sorry that I didn't write this tutorial until today; but without farther ado, let's begin.
The final result of this tutorial:

I've rotated my lightsaber around (R) with both the handle and the two blades selected in order to fit in the camera viewport better; I also moved the lamp, and adjusted the halo size. This can be done here:

Now when you render, you should get a result like this:

Now, for our purposes we want something better than just a dull, grey background, so let's change that. Select 'Blend Sky', then change the Horizon color to a very dark purple, and the Zenith color to a very dark blue. You should now get something like this:

Notice how I also changed the halo settings more; if you want your halo size smaller, but if you make it smaller you can see individual dots, simply go into Edit Mode and subdivide it again. Now our background still looks a little drab, so let's add something else to it. Go to the world buttons, and enable 'Stars', then click the little arrow that drops the menu down. Set the size to .04, the Colors to .25, and the Separation to 2. Also, you may have noticed that my camera dimensions are different than yours. In case you want the same, these are: 1280 by 720, rendered at 65%.
Now we should get something like this if we render:

That's good enough for now, so let's move on to the compositing. All we'll be doing is adding some Chromatic Aberration. Change the screen from 'Default' to 'Compositing'.

Select 'Use Nodes'. Two nodes will appear on the screen; move the Render Layer node to the upper left corner, and the Composite node to the lower right. You should now have a setup like this:

Now add a Lens Distortion node (Shift A - Distort - Lens Distortion), and connect the nodes as shown below (Click and drag).

Set the 'Dispersion' at 0.015, and render. Congrats! You have finished the 3rd part of this blender tutorial! If you have any questions, comments, or problems, post them in the comments below. Thanks for reading!
The final result of this tutorial:

I've rotated my lightsaber around (R) with both the handle and the two blades selected in order to fit in the camera viewport better; I also moved the lamp, and adjusted the halo size. This can be done here:

Now when you render, you should get a result like this:

Now, for our purposes we want something better than just a dull, grey background, so let's change that. Select 'Blend Sky', then change the Horizon color to a very dark purple, and the Zenith color to a very dark blue. You should now get something like this:

Notice how I also changed the halo settings more; if you want your halo size smaller, but if you make it smaller you can see individual dots, simply go into Edit Mode and subdivide it again. Now our background still looks a little drab, so let's add something else to it. Go to the world buttons, and enable 'Stars', then click the little arrow that drops the menu down. Set the size to .04, the Colors to .25, and the Separation to 2. Also, you may have noticed that my camera dimensions are different than yours. In case you want the same, these are: 1280 by 720, rendered at 65%.
Now we should get something like this if we render:

That's good enough for now, so let's move on to the compositing. All we'll be doing is adding some Chromatic Aberration. Change the screen from 'Default' to 'Compositing'.

Select 'Use Nodes'. Two nodes will appear on the screen; move the Render Layer node to the upper left corner, and the Composite node to the lower right. You should now have a setup like this:

Now add a Lens Distortion node (Shift A - Distort - Lens Distortion), and connect the nodes as shown below (Click and drag).

Set the 'Dispersion' at 0.015, and render. Congrats! You have finished the 3rd part of this blender tutorial! If you have any questions, comments, or problems, post them in the comments below. Thanks for reading!
Tuesday, August 24, 2010

Subscribe to:
Posts (Atom)